- 1. 引言
- 2. 纳尼,clang是一个driver?
- 参数字符串解析(ParseArgStrings)
- 4. 工具链准备
- 5. Action构建(BuildActions)
- 6. Jobs构建(BuildJobsForAction)
- 附录:driver执行过程中一些重要的函数
- 参考文献
1. 引言
在使用clang编译不同的代码文件时,所执行的具体命令不尽相同。以.c以及.s为例,前者需要进行预处理、编译、汇编、链接,而后者无需编译。这说明clang能够对不同输入文件进行规划,选取合适的编译作业流水实施编译。那么一个自然的问题是clang是如何根据输入文件来确定编译流水的?
解答的关键就是clang driver,因此我们将对clang driver实施分析。

2. 纳尼,clang是一个driver?
clang官网的介绍如下:
The Clang project provides a language front-end and tooling infrastructure for languages in the C language family (C, C++, Objective C/C++, OpenCL, CUDA, and RenderScript) for the LLVM project. Both a GCC-compatible compiler driver (clang) and an MSVC-compatible compiler driver (clang-cl.exe) are provided.
与我们对clang的第一印象不同,clang并不是一个独立、自我完备的多前端编译器。它只是一个driver与编译前端的结合体,其功能范围大致如下:
- 解析输入命令行中的参数,根据参数及文件类型确定编译命令列表(JobLists)。
- 提供编译器前端,解析多种语言,生成LLVM IR。(clang -cc1)
- 根据参数选择性地调用LLVM后端库,执行IR优化、汇编、指令生成等。(EmitBackendOutput)
当我们输入一串clang命令时,clang driver会解析命令参数,将选项字符串与预定义的选项表中某个条目关联起来。
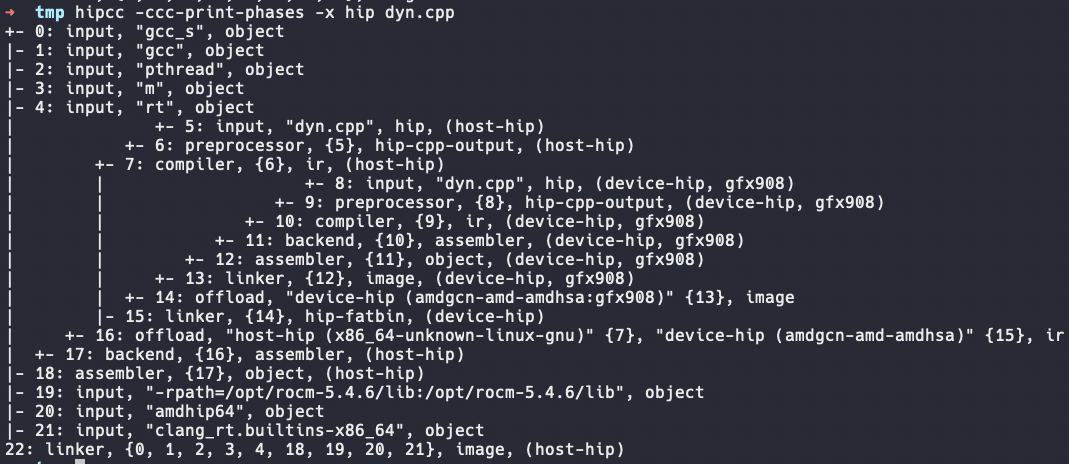
之后driver会逐一为输入源文件(无前缀的输入参数)构建action。如图1所示,在添加-ccc-print-phases选项后,clang就会显示构建出的action list。action是与具体编译工具无关的,用于在高层次表示编译的抽象动作,那为了绑定具体的编译命令,driver会根据输入文件类型(一般通过文件后缀,也可通过-x指定类型)选用合适的工具链。如我们编译HIP文件,就会选用HIPAMDToolChain。
绑定完毕后,driver会从工具链中选择对应的工具为actioin构建job,如选用gnu::ld为link action构建链接任务。部分连续的action可能会合并,并由单个工具负责,典型如将assemble->backend->compiler->preprocessor合并,由clang工具(具体点是clang -cc1)进行处理。将action绑定tool并构建出job后,我们就得到了最终的编译命令列表了(JobLists)了!

有了job lists,driver即可创建子进程逐一执行这些job命令。
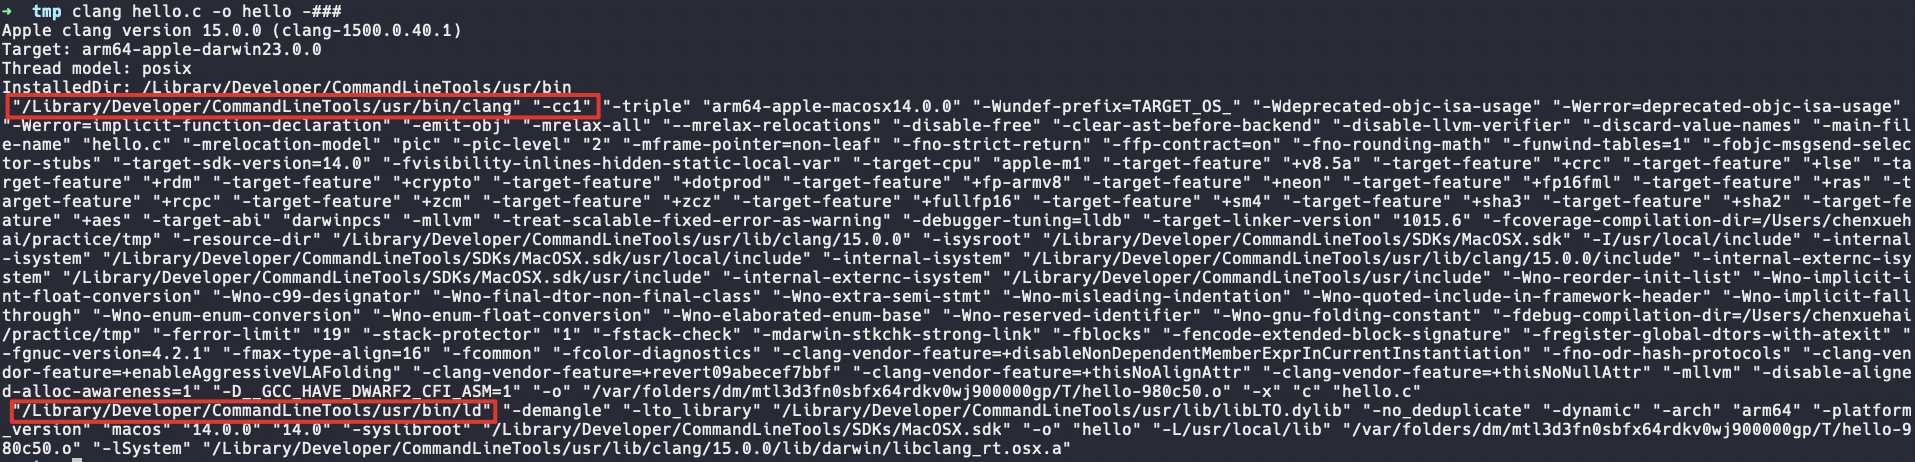
容易发现,图3中使用clang -cc1来编译hello.c文件,这里体现了clang的编译前端功能。cc1是clang实现的一个前端模块,当driver发现选项中含有-cc1参数时就会执行该模块,反之则会构建job list。cc1对源文件进行词语法分析、IR生成。同时,如果需要生成汇编、可重定位等文件,cc1会调用LLVM的后端库进行实现。即:编译器中后端的工作仍由LLVM的库完成,clang仅执行调用。
对cc1工作流程的分析属于另外一个话题,本文只关注 clang driver。
参数字符串解析(ParseArgStrings)
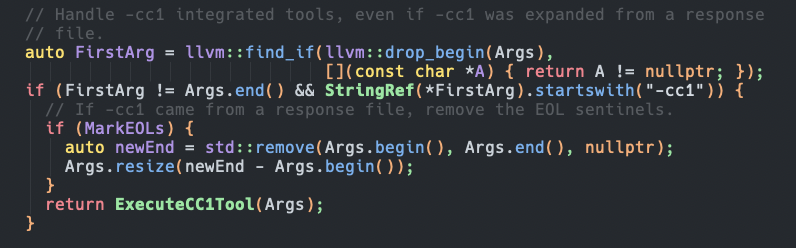
- clang的执行由clang_main函数起始。函数首先会判断输入参数是否含有
-cc1相关的选项。若是则调用cc1子模块执行编译,反之则执行driver的流程。
  // Handle -cc1 integrated tools.
  if (Args.size() >= 2 && StringRef(Args[1]).startswith("-cc1"))
    return ExecuteCC1Tool(Args, ToolContext);
- driver首要任务是解析输入字符串,因为后续需要遍历多次输入参数列表,以便在不同阶段获取相应的信息。那么将字符串预处理成结构化的信息列表是一种自然选择。
- clang使用ArgList来存储解析后的参数列表,每个Arg不仅包含原始的输入字符串,还绑定了一个Option对象。
- 根据选项类别的不同,Arg还可以携带额外的信息,比如一个
JoinedClass的Option(形如-xxx=value/-xvalue的选项)还存储了Arg的value。 - 解析依赖于一个OptTable选项表,该表按序存储了每个预先定义选项的信息,当某个参数字符串的前缀、名字及使用都与选项表中某项匹配时,将对应的Option与该字符串进行绑定,生成一个Arg并填入ArgList中。
3.1 OptTable中的Option包含哪些信息?
解析参数字符串依赖预定义的选项表OptTable,该表是每个选项信息的结构化表示,结构声明如下:
struct Info {
  /// A null terminated array of prefix strings to apply to name while
  /// matching.
  ArrayRef<StringLiteral> Prefixes; // 该选项的前缀
  StringRef Name;  // 选项名
  const char *HelpText; // 提示信息
  const char *MetaVar;
  unsigned ID; // 选项的ID,是OPT_XXX形式的枚举值
  unsigned char Kind; // 选项类别,如标志选项、输入选项、聚集选项(-x=b或-xb形式)等 类别
  unsigned char Param;
  unsigned int Flags;
  unsigned short GroupID;
  unsigned short AliasID;
  const char *AliasArgs;
  const char *Values; // 选项所有有效的值,如-libstdc++的有效值只有libc++,libstdc++,platform
};
我们可以在DriverOptions.cpp中找到该表的定义:
static constexpr OptTable::Info InfoTable[] = {
#define OPTION(...) LLVM_CONSTRUCT_OPT_INFO(__VA_ARGS__),
#include "clang/Driver/Options.inc"
#undef OPTION
};
经过宏展开后,其内容大致如下:
static constexpr llvm::StringLiteral prefix_1_init[] = {llvm::StringLiteral("-") , llvm::StringLiteral("")};
 static constexpr llvm::ArrayRef<llvm::StringLiteral> prefix_1( prefix_1_init, std::size(prefix_1_init) - 1); // prefix_1的定义

static constexpr OptTable::Info InfoTable[] = { // 宏展开后的InfoTable
llvm::opt::OptTable::Info { llvm::ArrayRef<llvm::StringLiteral>(), "<action group>", nullptr, nullptr, OPT_Action_Group, llvm::opt::Option::GroupClass, 0, 0, 0, OPT_INVALID, OPT_INVALID, nullptr, nullptr },
llvm::opt::OptTable::Info { llvm::ArrayRef<llvm::StringLiteral>(), "<CompileOnly group>", nullptr, nullptr, OPT_CompileOnly_Group, llvm::opt::Option::GroupClass, 0, 0, 0, OPT_INVALID, OPT_INVALID, nullptr, nullptr },
...
llvm::opt::OptTable::Info { prefix_0, "<input>", nullptr, nullptr, OPT_INPUT, llvm::opt::Option::InputClass, 0, 0, DefaultVis, OPT_INVALID, OPT_INVALID, nullptr, nullptr },
llvm::opt::OptTable::Info { prefix_0, "<unknown>", nullptr, nullptr, OPT_UNKNOWN, llvm::opt::Option::UnknownClass, 0, 0, DefaultVis, OPT_INVALID, OPT_INVALID, nullptr, nullptr },
llvm::opt::OptTable::Info { prefix_1, "-###", "Print (but do not run) the commands to run for this compilation", nullptr, OPT__HASH_HASH_HASH, llvm::opt::Option::FlagClass, 0, NoXarchOption, DefaultVis | CLOption | DXCOption | FlangOption, OPT_INVALID, OPT_INVALID, nullptr, nullptr },
...
llvm::opt::OptTable::Info { prefix_1, "-c", "Only run preprocess, compile, and assemble steps", nullptr, OPT_c, llvm::opt::Option::FlagClass, 0, NoXarchOption, DefaultVis | FlangOption, OPT_Action_Group, OPT_INVALID, nullptr, nullptr },
...
}
以选项-c为例,其前缀为”-“,是FlagClass类型,ID(宏名)是OPT_c。
3.2 OptTable如何生成?
那么OptTable是如何生成的呢?其实从上面的InfoTable中不难找到答案,它用到了一个Options.inc的文件,接触过llvm的人对.inc应该不陌生,它一般是由td文件通过tblgen解析生成的。因此选项应该都是由td文件进行描述,然后通过tblgen自动生成。
事实上OptTable选项的声明都位于include/clang/Driver/Options.td中。比如下面是”-c”的声明:
def c : Flag<["-"], "c">, Flags<[NoXarchOption, FlangOption]>, Group<Action_Group>,
  HelpText<"Only run preprocess, compile, and assemble steps">;
Flag<["-"], "c">表示这是一个FlagClass类型的选项,前缀是”-“,名字是”c”;后面的Flags<[NoXarchOptioin, FlangOption]>则是该选项的属性,这里表明”-c”不能通过-Xarch 传递给driver之后的工具,同时它也是Flang的一个选项;Group则列举了它所属的组别;最后是clang -help显示的该选项介绍。
如果想自己加一个选项也很简单,比如加入一个标志选项,在运行 clang driver时打印一句话,我们可以这样做:
-
在Options.td中添加该选项的描述:
def just_for_fun : Flag<["--"], "just-for-fun">, HelpText<"just show how to add flags in clang">; -
在clang driver执行完
ParseArgStrings后加入打印代码:bool has_just_for_fun = Args.hasArg(options::OPT_just_for_fun); if (has_just_for_fun) { printf("A greeting from clang driver!\n"); }
重新编译clang之后,在命令行中加入--just-for-fun就能打印问候信息了!

3.3 ArgList的最终归宿—>DerivedArgList
经过ParseArgStrings后,我们得到了一个ArgList,具体点是InputArgList。该list中每个Arg不仅记录了原始的参数字符串,同时也绑定了经过解析后的Option Info,是一个rich info structure。但此时还不是Arg的最终形态。
在原始的设计中,clang的一大核心理念是与gcc,cl等driver完全兼容。但某些功能在clang内部是由其他选项实现的,于是乎我们需要做一层翻译,把那些gcc style的选项翻译成clang内部的选项,以此达到兼容的目的。这一工作由TranslateInputArgs实现。
DerivedArgList *TranslatedArgs = TranslateInputArgs(*UArgs);
由于大部分gcc的选项与clang都一致,因此TranslateInputArgs只需要处理少数特殊的选项,比如将-Xlinker --no-demangle处理成内部的私有选项-Z-Xlinker-no-demangle。其余选项可以直接复制到DerivedArgList中。
4. 工具链准备
完成参数的解析后,下一步就是根据输入源文件选取合适的工具链备用了。在最开始介绍clang driver时,我们提到过clang需要先生成工具链无关的action list,然后再绑定具体的工具链将action翻译成具体的指令命令(jobs)。现在,我们已经解析完参数了,自然可以根据文件类型与某些选项来确定该用哪些工具链了。
4.1 创建host的工具链并注册
driver通过分析输入参数(如-target)可以提取出host的TargetTriple,进而可利用其创建host的工具链:
// Owned by the host.
const ToolChain &TC = getToolChain(
    *UArgs, computeTargetTriple(*this, TargetTriple, *UArgs));
之后driver会在创建Compilation类时,将该host的工具链注册到OrderedOffloadingToolchains中。
// The compilation takes ownership of Args.
Compilation *C = new Compilation(*this, TC, UArgs.release(), TranslatedArgs,
                                 ContainsError);

Compilation::Compilation(const Driver &D, const ToolChain &_DefaultToolChain,
                         InputArgList *_Args, DerivedArgList *_TranslatedArgs,
                         bool ContainsError)
    : TheDriver(D), DefaultToolChain(_DefaultToolChain), Args(_Args),
      TranslatedArgs(_TranslatedArgs), ContainsError(ContainsError) {
  // The offloading host toolchain is the default toolchain.
  OrderedOffloadingToolchains.insert(
      std::make_pair(Action::OFK_Host, &DefaultToolChain)); // 注册host的工具链
}
关于Offloading这个术语,可以这么理解:任何异构代码会被下放到某个设备去执行,该设备可以是普通的CPU,也可以是GPU、FPGA等加速器,所以把包括CPU在内的多设备统称为Offloading。在异构情形下,CPU被叫做host,它的工具链也被称为DefaultToolChain。
4.2 构建输入文件列表
正如此前强调的那样,driver需要通过分析每个输入文件的类型,然后选用合适的工具链构建编译命令,而这一步是由函数BuildInputs实现的。先看下输入源文件列表是什么数据结构:
using InputTy = std::pair<types::ID, const llvm::opt::Args *>;
using InputList = SmallVector<InputTy, 16>;
driver使用InputList来保存,该数据结构就是一个简单的pair数组,pair记录了一个源文件的类型以及对应的输入参数。clang中有哪些源文件类型可以查看Types.def,其中定义了各种源文件、编译中间文件的类型及额外信息。
TYPE("cpp-output",               PP_C,         INVALID,         "i",      phases::Compile, phases::Backend, phases::Assemble, phases::Link)
TYPE("c",                        C,            PP_C,            "c",      phases::Preprocess, phases::Compile, phases::Backend, phases::Assemble, phases::Link)
TYPE("cl",                       CL,           PP_C,            "cl",     phases::Preprocess, phases::Compile, phases::Backend, phases::Assemble, phases::Link)
TYPE("clcpp",                    CLCXX,        PP_CXX,          "clcpp",  phases::Preprocess, phases::Compile, phases::Backend, phases::Assemble, phases::Link)
TYPE("cuda-cpp-output",          PP_CUDA,      INVALID,         "cui",    phases::Compile, phases::Backend, phases::Assemble, phases::Link)
TYPE("cuda",                     CUDA,         PP_CUDA,         "cu",     phases::Preprocess, phases::Compile, phases::Backend, phases::Assemble, phases::Link)
TYPE("cuda",                     CUDA_DEVICE,  PP_CUDA,         "cu",     phases::Preprocess, phases::Compile, phases::Backend, phases::Assemble, phases::Link)
知道了InputList,那么如何构建这个列表呢?drvier处理过程如下:
- 遍历此前解析的ArgList,如果当前参数是InputClass,则说明是一个输入文件,着手处理。
- 先看之前有没有遇到-x选项,如果遇到过,那么直接以该选项设置的文件类型当作本参数的类型,填入InputList中。
- 如果没遇到过-x,则解析输入文件的后缀,查询其文件类型。
- 如果当前参数含有LinkerInput标志(-lxxx选项),则说明该参数的值是一个obj文件,将其填入InputList中。
- 如果当前参数是-x选项,则记录该选项设置的文件类型,供后续输入文件使用。
4.3 创建device的工具链并注册
有了InputList,接下来是分析其中是否包含特定设备的输入源文件,然后将对应的device工具链进行注册。该过程由CreateOffloadingDeviceToolChains实现,实现方式如下:
-
遍历InputList,判断其中是否有CUDA/HIP的文件类型。目前clang支持CUDA/HIP/OpenMP三种device的工具链。
-
以HIP为例,若找到HIP的输入源文件,则创建一个
HIPAMDToolChain的类,并将其注册到driver的ToolChains结构中。ToolChains是一个string map,对于HIP来说,它的索引key是由host的triple与HIP的triple组成的字符串。const ToolChain &Driver::getOffloadingDeviceToolChain( const ArgList &Args, const llvm::Triple &Target, const ToolChain &HostTC, const Action::OffloadKind &TargetDeviceOffloadKind) const { // Use device / host triples as the key into the ToolChains map because the // device ToolChain we create depends on both. auto &TC = ToolChains[Target.str() + "/" + HostTC.getTriple().str()]; // device的索引key是target triple + host triple字符串 if (!TC) { // Categorized by offload kind > arch rather than OS > arch like // the normal getToolChain call, as it seems a reasonable way to categorize // things. switch (TargetDeviceOffloadKind) { case Action::OFK_HIP: { if (Target.getArch() == llvm::Triple::amdgcn && Target.getVendor() == llvm::Triple::AMD && Target.getOS() == llvm::Triple::AMDHSA) TC = std::make_unique<toolchains::HIPAMDToolChain>(*this, Target, HostTC, Args); else if (Target.getArch() == llvm::Triple::spirv64 && Target.getVendor() == llvm::Triple::UnknownVendor && Target.getOS() == llvm::Triple::UnknownOS) TC = std::make_unique<toolchains::HIPSPVToolChain>(*this, Target, HostTC, Args); break; } default: break; } } return *TC; } -
同时,driver也会往
Compilation的OrderedOffloadingToolChains中注册本device的工具链。void addOffloadDeviceToolChain(const ToolChain *DeviceToolChain, Action::OffloadKind OffloadKind) { assert(OffloadKind != Action::OFK_Host && OffloadKind != Action::OFK_None && "This is not a device tool chain!"); // Update the host offload kind to also contain this kind. ActiveOffloadMask |= OffloadKind; OrderedOffloadingToolchains.insert( // 注册device toolchain到OrderedOffloadingToolChains中 std::make_pair(OffloadKind, DeviceToolChain)); }
5. Action构建(BuildActions)
当所有输入文件以及相关的工具链都准备好,下一步就是给每个输入文件生成对应的编译流水线。此前在引言中就提前给读者展示了action链的样子,我们这里先对其略加介绍,然后再分析clang driver是如何给输入文件构建action的。
- Action是一个工具链无关的抽象编译任务,比如我们所熟悉的预处理(preprocessor)、IR生成(compiler)、后端指令生成(backend)、汇编(assembler)、链接(linker)等。
- Action有概念意义上的输入与输出,根据输入输出的依赖关系可构建出action树,其中树根所表示的action被称为顶级action(TopLevel Action)。
- 大部分Action都对应一个具体的编译任务,但并不是所有action都这样,比如InputAction只是表示一个输入源文件,用作其他action的输入。
5.1 最后的参数诊断!
现在到了一个需要抉择的时刻,如果所有参数都合法,那么就继续后面的流程,否则报错终止。这个检查由函数handleArguments实现,先来看下源文件中对该函数的说明:
// handleArguments - All code related to claiming and printing diagnostics
// related to arguments to the driver are done here.
void handleArguments(Compilation &C, llvm::opt::DerivedArgList &Args,
                     const InputList &Inputs, ActionList &Actions) const;
在函数内部,是一些简单的选项检查。比如我们编译一个汇编文件,但是选项中却使用了-emit-llvm,就会报错。
关于为什么把最后的参数检查放到此阶段?主要是此时所有输入源文件都已经被分析(BuildInputs),我们可以得知该输入文件需要经历的编译阶段(phase),那么就可以实施一些特定编译阶段的检查。比如如果一个汇编文件(.s)的最终phase是link,但是参数含有-emit-llvm就可以在这里检查出来。
5.2 创建一个ActionBuilder吧
为了给不同的编程模型生成device actioin,clang提供了一个便利的接口类:OffloadingActionBuilder。于是clang会先创建一个OffloadingActionBuilder的实例并用它来构建device的actions。为了方便分析,我们以图6中编译一个hip为例进行说明。
先来看看OffloadingActionBuilder的构造函数做了些什么:
OffloadingActionBuilder(Compilation &C, DerivedArgList &Args,
                        const Driver::InputList &Inputs)
    : C(C) {
  // Create a specialized builder for each device toolchain.
  IsValid = true;
  // Create a specialized builder for CUDA.
  SpecializedBuilders.push_back(new CudaActionBuilder(C, Args, Inputs));
  // Create a specialized builder for HIP.
  SpecializedBuilders.push_back(new HIPActionBuilder(C, Args, Inputs));

  //
  // TODO: Build other specialized builders here.
  //

  // Initialize all the builders, keeping track of errors. If all valid
  // builders agree that we can use bundling, set the flag to true.
  unsigned ValidBuilders = 0u;
  unsigned ValidBuildersSupportingBundling = 0u;
  for (auto *SB : SpecializedBuilders) {
    IsValid = IsValid && !SB->initialize();

    // Update the counters if the builder is valid.
    if (SB->isValid()) {
      ++ValidBuilders;
      if (SB->canUseBundlerUnbundler())
        ++ValidBuildersSupportingBundling;
    }
  }
  CanUseBundler =
      ValidBuilders && ValidBuilders == ValidBuildersSupportingBundling;
}
构造函数分别为cuda与hip创建了一个特定的Builder,并将创建结果放入SpecializedBuilders中。然后执行各特定Builder的初始化(SB->initialize)。初始化是否成功由IsValid(注意与SB的isValid函数区分)记录。最后设置标志CanUseBundler表明是否所有有效的Builder都支持Bundler,Unbundler。
这里可能大家会有个疑问,既然SB存储了多个Builder,那么怎么区分哪些builder是有效的呢?
观察到SB有个isValid函数,不妨先看看其实现:
/// Return true if this builder is valid. We have a valid builder if we have
/// associated device tool chains.
bool isValid() { return !ToolChains.empty(); }
这里的判断相当简单,只检查DeviceActionBuilder中的ToolChains数组非空!
于是,我们继续看看HIPActionBuilder是如何设置其ToolChains的,这段设置代码位于initialize函数中,相关实现如下:
bool initialize() override {
  ...
  // We don't need to support CUDA.
  if (AssociatedOffloadKind == Action::OFK_Cuda && // 如果是CUDADeviceActionBuilder但是输入文件中无CUDA文件,直接返回
      !C.hasOffloadToolChain<Action::OFK_Cuda>())
    return false;
  // We don't need to support HIP.
  if (AssociatedOffloadKind == Action::OFK_HIP && // 如果是HIPDeviceActionBuilder但是输入文件中吴HIP文件,同样直接返回
      !C.hasOffloadToolChain<Action::OFK_HIP>())
    return false;
  ...
  ToolChains.push_back( // 否则源文件存在cuda或者hip,则根据当前的builder类型压入合适的toochain!
      AssociatedOffloadKind == Action::OFK_Cuda
          ? C.getSingleOffloadToolChain<Action::OFK_Cuda>()
          : C.getSingleOffloadToolChain<Action::OFK_HIP>());
  ...
}
AssocaitedOffloadKind是DeviceActionBuilder构建时设置的值,对于HIPActionBuilder,其值是OFK_HIP。这段初始化代码会根据当前Builder的类型在Compilation的OrderedOffloadingToolChains中查找是否有相应的工具链,如果有,则将其压入Builder的ToolChains中。而OrderedOffloadingToolChains在之前的4.3节中介绍过,它会分析输入参数,判断是否有hip源文件,有则创建一个HIPAMDToolChain并压入该数组中。
现在,关于SpecializedBuilders中哪些Builder是有效的已经清晰了,只要输入源文件中含有cuda或者hip,则cuda或者hip的DeviceActionBuilder就有效。
5.3 逐Phase构建Actions
一切准备就绪,clang开始遍历输入文件列表(InputList),为每个输入文件构建Actions了。
每个输入文件都有预设好的完整编译phase,这些在Types.def文件中可以看到,比如c文件默认有预处理、编译、后端、汇编、链接完整的5个阶段:
TYPE("c", C, PP_C, "c", phases::Preprocess, phases::Compile, phases::Backend, phases::Assemble, phases::Link)
当然,由于我们可以添加选项控制编译流程,一个输入文件的实际编译phase可能不会执行完所有流程,比如添加-c那么就不会有phases::Link了。clang首先分析输入参数以及该文件的类型,获取实际要执行的编译阶段:
auto PL = types::getCompilationPhases(*this, Args, InputType);
之后,clang为输入文件生成起始的InputAction。如我们之前所说,这个Action仅表示输入文件,并不执行任何任务:
// Build the pipeline for this file.
Action *Current = C.MakeAction<InputAction>(*InputArg, InputType); // 为host创建一个InputAction

// Use the current host action in any of the offloading actions, if
// required.
if (!UseNewOffloadingDriver)
  if (OffloadBuilder->addHostDependenceToDeviceActions(Current, InputArg)) // 为device也创建一个InputAction
    break;
有了InputAction,接下来就是逐phase构建host与device的action!我们遍历实际需要的phase,在每个phase开始,先准备好该阶段host依赖的device dependence,依赖满足后即可构建该阶段的host action。构建完后再将该host action作为host dependence添加给device,以满足device潜在的对host的依赖。这部分代码大致逻辑如下:
 for (phases::ID Phase : PL) {
  // Add any offload action the host action depends on.
  Current = OffloadBuilder->addDeviceDependencesToHostAction( // 创建此phase host依赖的device actions
      Current, InputArg, Phase, PL.back(), FullPL);
  ...
  // Otherwise construct the appropriate action.
  Action *NewCurrent = ConstructPhaseAction(C, Args, Phase, Current); // 构建此phase的host action
  ...
  Current = NewCurrent;
  ...
  OffloadBuilder->addHostDependenceToDeviceActions(Current, // 将host action作为host dependence添加给device,看device是否对其有需要
                                                   InputArg))
  ...
}
5.4 device对host的依赖?
每当构建完一个新的host action,都会调用下OffloadBuilder->addHostDependenceToDeviceActions来满足device对host的依赖。那么device会对host有哪些依赖呢?一句话总结就是对输入源文件的依赖!也就是device只依赖host的InputAction,并利用它来触发自身action的构建。我们现在来看下这个处理流程:
- 首先,如果该host action是
InputAction,但输入源文件不是高级语言代码(比如一个汇编)。那么就可能是一个bundle文件(比如host,device的混合.ll,.s文件),需要先为host新建一个unbundling action。
  if (CanUseBundler && isa<InputAction>(HostAction) &&
      InputArg->getOption().getKind() == llvm::opt::Option::InputClass &&
      (!types::isSrcFile(HostAction->getType()) ||
       HostAction->getType() == types::TY_PP_HIP)) { // 如果输入不是代码源文件,比如汇编,那么就可能是一个host,device的bundle文件,此时需要执行unbundle分离
    auto UnbundlingHostAction =
        C.MakeAction<OffloadUnbundlingJobAction>(HostAction);
    UnbundlingHostAction->registerDependentActionInfo(
        C.getSingleOffloadToolChain<Action::OFK_Host>(),
        /*BoundArch=*/StringRef(), Action::OFK_Host);
    HostAction = UnbundlingHostAction;
    recordHostAction(HostAction, InputArg);
  }
- 接着,遍历所有有效的DeviceActionBuilder,调用
addDeviceDependences接口来处理这个host dependence:
  // Register the offload kinds that are used.
  auto &OffloadKind = InputArgToOffloadKindMap[InputArg];
  for (auto *SB : SpecializedBuilders) {
    if (!SB->isValid())
      continue;
    auto RetCode = SB->addDeviceDependences(HostAction); // 处理该host dependence
    ...
    // Unless the builder was inactive for this action, we have to record the
    // offload kind because the host will have to use it.
    if (RetCode != DeviceActionBuilder::ABRT_Inactive)
      OffloadKind |= SB->getAssociatedOffloadKind();
  }
我们解释下什么是host dependence:如果B依赖A,那么就称A是(B的)一个dependence,如果A是一个host action,就称A为host dependence。相应地,如果A是device action,则称其为device dependence。明白了这个,就能理解addHostDependeceToDeviceActions以及addDeviceDependeceToHostActions的名称含义。
因为device只依赖host的输入action,具体来说是InputAction或者UnbundlingAction。 因此在addDeviceDependences中只需要检测是否是这两种情形,并分别创建device的InputAction或引用OffloadUnbundlingAction作为device的起始action。
if (auto *IA = dyn_cast<InputAction>(HostAction)) {
  ...
  for (unsigned I = 0, E = GpuArchList.size(); I != E; ++I) { // 为每种device创建起始action,默认下只有一种device架构
    CudaDeviceActions.push_back(
        C.MakeAction<InputAction>(IA->getInputArg(), Ty, IA->getId()));
  }

  return ABRT_Success;
}

// If this is an unbundling action use it as is for each CUDA toolchain.
if (auto *UA = dyn_cast<OffloadUnbundlingJobAction>(HostAction)) {
  ...
  CudaDeviceActions.clear(); // 清除device action,注意这个数组是每个架构一项,也就是只关心其中一项即可
  auto *IA = cast<InputAction>(UA->getInputs().back());
  ...

  for (auto Arch : GpuArchList) { // 为每个架构创建起始action,默认下一般只有一种架构
    CudaDeviceActions.push_back(UA); // 创建起始action
    UA->registerDependentActionInfo(ToolChains[0], Arch, // 完善这个UA的信息
                                    AssociatedOffloadKind);
  }
  IsActive = true;
  return ABRT_Success;
}
- 最后,如果处理过程没有错误,则返回false。
5.5 host对device的依赖?
device只对host的input action有依赖,以此来触发device action的构建。那么host对device又有哪些依赖呢?
这里需要分phase进行讨论,addDeviceDependenceToHostActions的设计如下:
-
device actions的当前输入由
CudaDeviceActions记录,该结构记录了上一次生成的device action,也就是本次device action的输入。如果检测到CudaDeviceActions为空,那么无论当前是什么phase,都直接返回;否则执行后续处理。if (CudaDeviceActions.empty()) return ABRT_Success; -
如果当前phase是preprocessor、compile、assemble,则执行默认的phase action构建,分别建立
PreprocessorJobAction、CompileJobAction与AssembleJobAction。// By default, we produce an action for each device arch. for (Action *&A : CudaDeviceActions) A = C.getDriver().ConstructPhaseAction(C, Args, CurPhase, A, AssociatedOffloadKind); -
如果当前phase是backend,则构建完整的fatbin,并与host用offload action bundle到一起,同时清除
CudaDeviceActions。以图6为例,在执行到backend这个phase时,CudaDeviceActions中保存的是device的CompilejobActioin,clang会在此phase中依次构建BackendJobAction->AssembleJobAction->LinkJobAction->OffloadAction->LinkJobAction(用于生成fatbin的特殊action),接着会创建一个OffloadAction将host当前的action(CompileJobAction)与device最后的LinkJobAction捆绑起来。此后由于CudaDeviceActions被clear,因此不会再创建device相关的action了。if (!Relocatable && CurPhase == phases::Backend && !EmitLLVM && !EmitAsm && ShouldLink) { // If we are in backend phase, we attempt to generate the fat binary. // We compile each arch to IR and use a link action to generate code // object containing ISA. Then we use a special "link" action to create // a fat binary containing all the code objects for different GPU's. // The fat binary is then an input to the host action. for (unsigned I = 0, E = GpuArchList.size(); I != E; ++I) { ... BackendAction = C.getDriver().ConstructPhaseAction( // 创建backend action C, Args, phases::Backend, CudaDeviceActions[I], AssociatedOffloadKind); auto AssembleAction = C.getDriver().ConstructPhaseAction( // assemble action C, Args, phases::Assemble, BackendAction, AssociatedOffloadKind); AL.push_back(AssembleAction); // Create a link action to link device IR with device library // and generate ISA. CudaDeviceActions[I] = C.MakeAction<LinkJobAction>(AL, types::TY_Image); // link action ... // OffloadingActionBuilder propagates device arch until an offload // action. Since the next action for creating fatbin does // not have device arch, whereas the above link action and its input // have device arch, an offload action is needed to stop the null // device arch of the next action being propagated to the above link // action. OffloadAction::DeviceDependences DDep; DDep.add(*CudaDeviceActions[I], *ToolChains.front(), GpuArchList[I], AssociatedOffloadKind); CudaDeviceActions[I] = C.MakeAction<OffloadAction>( // offload action隔开信息传播 DDep, CudaDeviceActions[I]->getType()); } if (!CompileDeviceOnly || !BundleOutput || *BundleOutput) { // Create HIP fat binary with a special "link" action. CudaFatBinary = C.MakeAction<LinkJobAction>(CudaDeviceActions, // 特殊的link action构建fatbin types::TY_HIP_FATBIN); if (!CompileDeviceOnly) { DA.add(*CudaFatBinary, *ToolChains.front(), /*BoundArch=*/nullptr, AssociatedOffloadKind); // Clear the fat binary, it is already a dependence to an host // action. CudaFatBinary = nullptr; } // Remove the CUDA actions as they are already connected to an host // action or fat binary. CudaDeviceActions.clear(); } ... } -
如果当前phase是Link,则将
CudaDeviceActions当前记录的Action转存到DeviceLinkerInputs,之后appendLinkeDeviceActions会创建设备的link action。
6. Jobs构建(BuildJobsForAction)
6.1 基本思路
经过BuildActions后,所有编译源文件被处理成了一棵action树(这里并不严谨,也有可能是森林)。那么后续要做的就是将所有action绑定编译工具,然后生成具体的编译命令了。
怎么处理这棵action树呢?毫无疑问,当然是dfs啦!这是遍历图最基本的思路。我们可以将BuildJobsForAction看作是一个dfs递归函数,它的输入参数是要处理的action子树以及一些额外信息,输出就是action的结果文件名,以及该子树所有的编译jobs。当要处理一个action时,先递归处理其Inputs,然后为该action绑定编译工具、构建编译命令。
- 对每个action的处理,总体原则类似,细节可能会有所不同。先介绍几个特别的action:
- InputAction:比较简单,因为它仅表示一个输入源文件,因此直接返回该源文件对应的InputInfo即可。
- BindArchAction:也简单,对它的处理就是根据arch设置host的工具链,然后递归处理其输入依赖action。
- OffloadAction:处理相对复杂,它有4种使用方式,每种使用方式及相应的处理如下:
 // The offload action is expected to be used in four different situations.
 //
 // a) Set a toolchain/architecture/kind for a host action:
 //    Host Action 1 -> OffloadAction -> Host Action 2
 //
 // b) Set a toolchain/architecture/kind for a device action;
 //    Device Action 1 -> OffloadAction -> Device Action 2
 //
 // c) Specify a device dependence to a host action;
 //    Device Action 1  _
 //                      \
 //      Host Action 1  ---> OffloadAction -> Host Action 2
 //
 // d) Specify a host dependence to a device action.
 //      Host Action 1  _
 //                      \
 //    Device Action 1  ---> OffloadAction -> Device Action 2
 //
 // For a) and b), we just return the job generated for the dependences. For
 // c) and d) we override the current action with the host/device dependence
 // if the current toolchain is host/device and set the offload dependences
 // info with the jobs obtained from the device/host dependence(s).
对于a) b)这两种方式,OffloadAction并无实际含义,仅是用于分隔Offload信息向前传播的标志。这种情形下直接递归处理Action 1并返回即可;对于c) ,先递归处理Device Action1,然后改写当前action为Host Action1,之后把Device Action1当做Host Action1的输入依赖;对于d),与c)类似。
- 现在来看下普通action的处理流程:
-
首先,clang需要为action绑定具体的编译工具。在绑定工具前,clang首先尝试将当前action与它的输入依赖进行合并,典型的如将assemble->backend->compile进行合并。之后再调用工具链的getTool接口为不同action分配工具。
ActionList Inputs = A->getInputs(); const JobAction *JA = cast<JobAction>(A); ActionList CollapsedOffloadActions; // action合并时,如果遇到offloadaction,则将其收集放入其中 ToolSelector TS(JA, *TC, C, isSaveTempsEnabled(), embedBitcodeInObject() && !isUsingLTO()); const Tool *T = TS.getTool(Inputs, CollapsedOffloadActions); // 尝试合并action并为action绑定工具 - 之后,如果发现合并action时存在OffloadAction,那么需要先为Offload的device/host构建jobs,并收集他们的输出作为当前合并后action的输入。以图6为例,18,17,7,6会被合并,合并后的action绑定clang,此时合并中存在16这一OffloadAction,需要递归为15 BuildJobs。
// If we've collapsed action list that contained OffloadAction we // need to build jobs for host/device-side inputs it may have held. for (const auto *OA : CollapsedOffloadActions) cast<OffloadAction>(OA)->doOnEachDependence( /*IsHostDependence=*/BuildingForOffloadDevice, [&](Action *DepA, const ToolChain *DepTC, const char *DepBoundArch) { OffloadDependencesInputInfo.append(BuildJobsForAction( C, DepA, DepTC, DepBoundArch, /* AtTopLevel */ false, /*MultipleArchs=*/!!DepBoundArch, LinkingOutput, CachedResults, DepA->getOffloadingDeviceKind())); }); - 接着,clang将遍历合并后action的输入,并递归地处理他们,处理结果连同上一步的
OffloadDependencesInputInfo共同作为当前合并action的输入。 - 下一步,将确定当前action最终输出的结果文件名及其路径。
- 最后,调用ConstructJobs完成最终命令的创建。
-
6.2 绑定工具
上一小节大致介绍了下BuildJobsForAction的基本过程, 本小节我们将深入ToolSelector.getTool函数,探究其是如何合并action、绑定编译工具的。
首先,函数会从当前action开始,沿着它的输入依赖构建一条尽可能长的单链。如果这个过程遇到一个action有多个输入依赖,则链条不再扩增。但是有一个例外,就是OffloadAction,它会将选择与OffloadAction后继相同的OFK_KIND继续扩增,而将另一边的device/host action保存起来:
//
// Get the largest chain of actions that we could combine.
//
SmallVector<JobActionInfo, 5> ActionChain(1);
ActionChain.back().JA = BaseAction; // 起始action
while (ActionChain.back().JA) {
  const Action *CurAction = ActionChain.back().JA;

  // Grow the chain by one element.
  ActionChain.resize(ActionChain.size() + 1);
  JobActionInfo &AI = ActionChain.back();

  // Attempt to fill it with the
  // 获取当前action的输入依赖Action,Action如果是OffloadAction,则把与CurAction不同的另一边Action保存到AI.SavedOffloadAction中
  AI.JA =
      getPrevDependentAction(CurAction->getInputs(), AI.SavedOffloadAction);
}

// Pop the last action info as it could not be filled.
ActionChain.pop_back();
接着,会尝试所有可能的合并,如果最终都合并失败,则为当前action绑定工具,否则为合并后最前面的action绑定工具:
//
// Attempt to combine actions. If all combining attempts failed, just return
// the tool of the provided action. At the end we attempt to combine the
// action with any preprocessor action it may depend on.
//
const Tool *T = combineAssembleBackendCompile(ActionChain, Inputs,
                                              CollapsedOffloadAction);
if (!T)
  T = combineAssembleBackend(ActionChain, Inputs, CollapsedOffloadAction);
if (!T)
  T = combineBackendCompile(ActionChain, Inputs, CollapsedOffloadAction);
if (!T) { // 所有合并尝试失败,直接为该action绑定工具
  Inputs = BaseAction->getInputs();
  T = TC.SelectTool(*BaseAction);
}

combineWithPreprocessor(T, Inputs, CollapsedOffloadAction);
return T;
我们以combineAssembleBackendCompile为例看下这个合并过程是如何进行的:
const Tool *
combineAssembleBackendCompile(ArrayRef<JobActionInfo> ActionInfo,
                              ActionList &Inputs,
                              ActionList &CollapsedOffloadAction) {
  if (ActionInfo.size() < 3 || !canCollapseAssembleAction())
    return nullptr;
  auto *AJ = dyn_cast<AssembleJobAction>(ActionInfo[0].JA); // 单链第一个是否是assemble
  auto *BJ = dyn_cast<BackendJobAction>(ActionInfo[1].JA); // 第二个是否是backend
  auto *CJ = dyn_cast<CompileJobAction>(ActionInfo[2].JA); // 第三个是否是compile
  if (!AJ || !BJ || !CJ) // 不满足条件返回空
    return nullptr;

  // Get compiler tool.
  const Tool *T = TC.SelectTool(*CJ); // 满足条件则为compile选择工具,作为合并后这3个action的编译工具
  if (!T)
    return nullptr;
  ...
  Inputs = CJ->getInputs();
  AppendCollapsedOffloadAction(CollapsedOffloadAction, ActionInfo, // 收集合并过程中的offload action
                               /*NumElements=*/3);
  return T;
}
函数先判断待合并的连续三个action是否符合要求,若符合,则选择依赖链最前的compile绑定的工具作为合并后的工具。同时,函数会将合并的这三个action中遇到的OffloadAction添加到CollapsedOffloadAction中。
最后,我们可以给clang添加选项-ccc-print-bindings来查看最终绑定的工具,及对应的输入输出:

6.3 构建编译命令(Jobs)
每个action绑定好工具,并确定好输入输出后,可以直接根据参数以及输入输出文件来构建最终的编译命令了。这一步是通过每个Tool的接口函数ConstructJob实现的,以下是AMDGCN::Linker对应的构建方式:
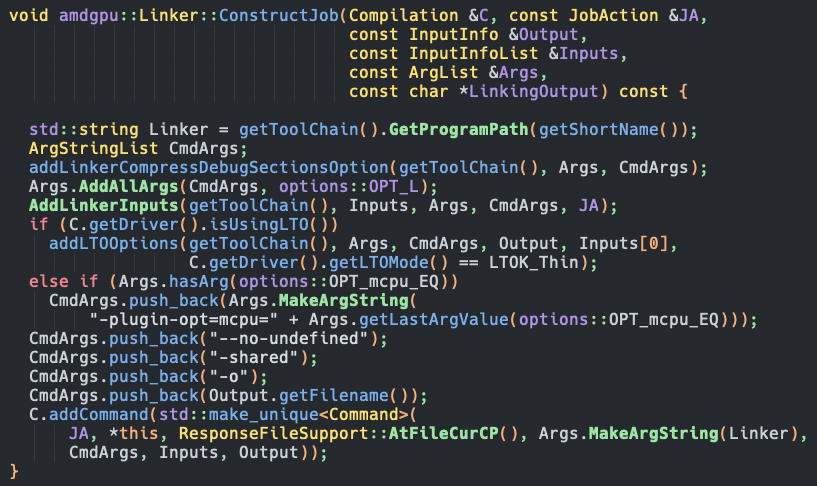
至此,driver构建命令的过程基本讲解完了,后续就是调用driver的ExecuteCompilation创建子进程依次执行这些命令了。
附录:driver执行过程中一些重要的函数
clang_main
  -> Driver.BuildCompilations(ArrayRef<const char*> ArgList)
    -> ParseArgStrings(ArgList.slice(1),...) // 忽略clang可执行文件名
      -> OptTable.ParseArgs(ArgStrings,...) // 返回InputArgList,给每个输入参数构建对应的Arg(绑定参数字符串与Option)
    -> TranslateInputArgs(const InputArgList &Args) // 将InputArgList->DerivedArgList
    -> new Compilation(Driver, Toolchain, InputArgList, TranslatedInputArgList, ...)
    -> BuildInputs(DefaultToolchain/* host */, TranslatedArgs, Inputs) // Inputs is the result
    -> CreateOffloadingDeviceToolChains(Compilation, Inputs) // 创建device的toolchain
      -> Driver.getOffloadingDeviceToolChain()
      -> Compilation.addOffloadDeviceToolChain(DeviceToolChain, OffloadKind)
    -> BuildActions(Compilation, TranslatedArgs, Inputs, Actions) // Actions是输出
      -> handleArguments(Compilation, TranslatedArgs, Inputs, Actions) // 做最后的参数正确性诊断
        -> getFinalPhase(TranslatedArgs, FinalPhase) // 遍历选项确定编译的最后phase
      -> OffloadBuilder = make_unique<OffloadingActionBuilder>(Compilation, Args, InputList) // 创建device的action builder
      -> addHostDependenceToDeviceActions(...)
      -> addDeviceDependenceToHostActions(...)
    -> BuildJobsForAction(...)
  -> Driver.ExecuteCompilation(...)
    -> Compilation.ExecuteJobs(...)
      -> ExecuteCommands(...)