LLVM 后端架构之Target类
1. LLVM中Target类的作用
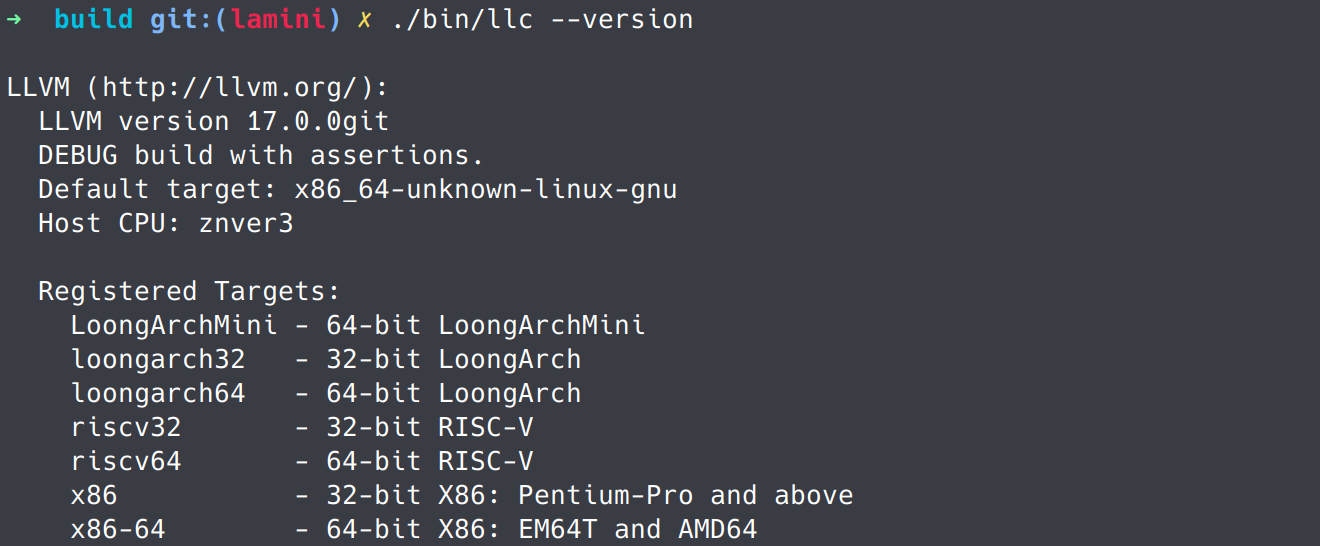
在llvm中,可以使用llc --version来查看编译器支持的后端架构:
$ llc --version
  ...
  Registered Targets:
    riscv32 - 32-bit RISC-V
    riscv64 - 64-bit RISC-V
    x86     - 32-bit X86: Pentium-Pro and above
    x86-64  - 64-bit X86: EM64T and AMD64
    ...
也可以使用llc -march=<some_target>来生成架构为some_target的代码:

那么给定一个目标架构的字符串(如本例中的x86_64与riscv64),llc是如何通过字符串来确定架构的描述信息?这个描述信息又是何种数据结构呢?解答的关键在于Target类。
在LLVM中,每个架构都通过一个Target类来进行描述。当实现一个新架构时需要先初始化一个Target对象,之后将该对象注册到Target列表中。后续当编译工具需要获取某个架构的信息时,可以通过架构的名字或者Triple来查找对应的Target,并调用其中的特征类构造函数(一些函数指针)来生成特定信息的描述类。比如我想获取X86_64架构下的某条指令信息,那么可以这么做:
- 通过
X86_64-unknown-linux-gnu这个Triple查找注册表获取该架构的Target。 - 调用
Target中指令信息描述类MCInstrInfo的构造函数来实例一个对象。 - 通过
MCInstrInfo的接口获取该指令的信息。
从中可以看到,Target是一个架构最顶层的核心接口,通过该接口可以获取该架构的所有信息。关于该类的介绍,也可以阅读下官方文档的介绍。
2. Target的设计与实现
2.1 实现
Target的实现非常简单,其数据成员主要分为基本架构描述信息与目标架构特征类的构造函数两部分,此外还有一个Target *Next指针将所有注册的Target链接起来。
-
架构描述信息如下:
/// The target function for checking if an architecture is supported. ArchMatchFnTy ArchMatchFn; /// Name - The target name. const char *Name; /// ShortDesc - A short description of the target. const char *ShortDesc; /// BackendName - The name of the backend implementation. This must match the /// name of the 'def X : Target ...' in TableGen. const char *BackendName; /// HasJIT - Whether this target supports the JIT. bool HasJIT;ArchMatchFn是一个bool (*)(Triple::ArchType Arch)类型的谓词函数,用于判断本Target是否与Arch一致。Name是架构的名字,注册架构时提供,一般是小写的形式,如前例中llc --version输出的riscv32。ShortDesc是架构的简介绍,如32-bit RISC-V。BackendName与在td文件中的名字要一致,如大写的X86。HasJIT表示该架构是否实现了JIT。
-
部分架构特征类的构造函数如下:
/// MCAsmInfoCtorFn - Constructor function for this target's MCAsmInfo, if
/// registered.
MCAsmInfoCtorFnTy MCAsmInfoCtorFn;

/// Constructor function for this target's MCObjectFileInfo, if registered.
MCObjectFileInfoCtorFnTy MCObjectFileInfoCtorFn;

/// MCInstrInfoCtorFn - Constructor function for this target's MCInstrInfo,
/// if registered.
MCInstrInfoCtorFnTy MCInstrInfoCtorFn;

...
这些构造函数可用于生成你需要的各种架构信息对象,如指令信息、寄存器信息、目标文件生成相关的信息等。并不是所有构造函数都需要注册,事实上这些构造函数一开始都为空,当该架构需要某些功能时在实现相关类并注册即可。一个简单的例子是没有实现JIT的架构是不需要注册
AsmPrinterCtorFn的。
2.2 注册
所有架构特征类与架构本身的注册都是通过TargetRegistry接口类实现的。
-
架构特征类注册接收一个
Target以及要注册的特征类构造函数,直接赋值即可。比如下面就是MCInstrInfo的注册函数:static void RegisterMCInstrInfo(Target &T, Target::MCInstrInfoCtorFnTy Fn) { T.MCInstrInfoCtorFn = Fn; } -
架构本身注册的话就是在注册链表中加入该
Target:void TargetRegistry::RegisterTarget(Target &T, const char *Name, const char *ShortDesc, const char *BackendName, Target::ArchMatchFnTy ArchMatchFn, bool HasJIT) { assert(Name && ShortDesc && ArchMatchFn && "Missing required target information!"); // Check if this target has already been initialized, we allow this as a // convenience to some clients. if (T.Name) return; // Add to the list of targets. T.Next = FirstTarget; FirstTarget = &T; T.Name = Name; T.ShortDesc = ShortDesc; T.BackendName = BackendName; T.ArchMatchFn = ArchMatchFn; T.HasJIT = HasJIT; }实际注册时可以使用辅助模板
RegisterTarget声明一个模板类对象,该类的构造函数会调用上面的注册函数。
2.3 查找
-
既然所有架构都在一个全局链表中,只需要遍历即可。
-
由于
Triple是一个架构的唯一标识(字符串最后也是转换为Triple),遍历时用其作为key索引Target。 -
用于无需手写查找函数,LLVM中的
TargetRegistry::lookupTarget封装了该查找功能。const Target *TargetRegistry::lookupTarget(const std::string &TT, std::string &Error) { // Provide special warning when no targets are initialized. if (targets().begin() == targets().end()) { Error = "Unable to find target for this triple (no targets are registered)"; return nullptr; } Triple::ArchType Arch = Triple(TT).getArch(); auto ArchMatch = [&](const Target &T) { return T.ArchMatchFn(Arch); }; //比较函数 auto I = find_if(targets(), ArchMatch); //遍历查找 if (I == targets().end()) { Error = "No available targets are compatible with triple \"" + TT + "\""; return nullptr; } auto J = std::find_if(std::next(I), targets().end(), ArchMatch); //确保Target唯一 if (J != targets().end()) { Error = std::string("Cannot choose between targets \"") + I->Name + "\" and \"" + J->Name + "\""; return nullptr; } return &*I; }
3. 如何注册一个新Target
如果你想新注册一个名为LoongArchMini的架构,那么你大致需要做如下一些事情:
-
修改根目录1下CMakeLists.txt。在变量
LLVM_ALL_TARGETS的定义中新增需要支持的架构LoongArchMini。因为后面使用cmake -DLLVM_TARGETS_TO_BUILD=LoongArchMini进行编译时会检测构建的架构是否是LLVM_ALL_TARGETS中的某个,不注册将构建失败。diff --git a/llvm/CMakeLists.txt b/llvm/CMakeLists.txt index 8a02f017cac7..9bf446d8e2a1 100644 --- a/llvm/CMakeLists.txt +++ b/llvm/CMakeLists.txt @@ -432,6 +432,7 @@ set(LLVM_ALL_TARGETS Hexagon Lanai LoongArch + LoongArchMini Mips MSP430 NVPTX -
添加
LoongArchMini的Triple。Triple是llvm中架构的唯一身份,需要添加对应的枚举常量以及判断函数。diff --git a/llvm/include/llvm/TargetParser/Triple.h b/llvm/include/llvm/TargetParser/Triple.h index 8d600989c8cf..a9b491c947c1 100644 --- a/llvm/include/llvm/TargetParser/Triple.h +++ b/llvm/include/llvm/TargetParser/Triple.h @@ -60,6 +60,7 @@ public: hexagon, // Hexagon: hexagon loongarch32, // LoongArch (32-bit): loongarch32 loongarch64, // LoongArch (64-bit): loongarch64 + loongarchmini, // LoongArchMini: tutorial version of LoongArch m68k, // M68k: Motorola 680x0 family mips, // MIPS: mips, mipsallegrex, mipsr6 mipsel, // MIPSEL: mipsel, mipsallegrexe, mipsr6el @@ -851,6 +852,11 @@ public: return getArch() == Triple::loongarch32 || getArch() == Triple::loongarch64; } + /// Tests whether the target is LoongArchMini + bool isLoongArchMini() const { + return getArch() == Triple::loongarchmini; + } + /// Tests whether the target is MIPS 32-bit (little and big endian). bool isMIPS32() const { return getArch() == Triple::mips || getArch() == Triple::mipsel; -
提供构建成功必要的函数接口。一些llvm工具会调用架构相关的一些初始化接口,你需要在
CodeGen库中提供这些函数的定义2,否则那些工具(比如llvm-mc)的构建将找不到符号定义。这些函数如下:
-
位于llvm/lib/Target/LoongArchMini/LoongArchMiniTargetMachine.cpp中的
LLVMInitializeLoongArchMiniTarget:extern "C" void LLVMInitializeLoongArchMiniTarget() { } -
位于llvm/lib/Target/LoongArchMini/LoongArchMiniMCTargetDesc.cpp中的
LLVMInitializeLoongArchMiniTargetMC:extern "C" void LLVMInitializeLoongArchMiniTargetMC() { }
-
-
添加架构注册的代码。按照LLVM的接口约定,注册应该由位于
llvm/lib/Target/LoongArchMini/TargetInfo/LoongArchMiniTargetInfo.cpp中的LLVMInitializeLoongArchMiniTargetInfo函数实现:#include "TargetInfo/LoongArchMiniTargetInfo.h" #include "llvm/MC/TargetRegistry.h" using namespace llvm; Target &llvm::getTheLoongArchMiniTarget() { static Target TheLoongArchMiniTarget; return TheLoongArchMiniTarget; } extern "C" void LLVMInitializeLoongArchMiniTargetInfo() { RegisterTarget<Triple::loongarchmini, /*HasJIT=*/true> X( getTheLoongArchMiniTarget(), "LoongArchMini", "64-bit LoongArchMini", "LoongArchMini"); } -
在这些新增的目录下添加CMakeLists.txt文件。可以参考其他架构中对应目录的构建文件,最终的目录树如下:
LoongArchMini
+---CMakeLists.txt
+---LoongArchMiniTargetMachine.cpp
+---MCTargetDesc
|   +---CMakeLists.txt
|   |---LoongArchMiniMCTargetDesc.cpp
|   +---LoongArchMiniMCTargetDesc.h
+---TargetInfo
    +---CMakeLists.txt
    |---LoongArchMiniTargetInfo.cpp
    +---LoongArchMiniTargetInfo.h
最后如果顺利的话,构建出的llc在使用--version时,输出会有LoongArchMini架构:

